Wednesday, August 31, 2011

Tutorial: Box of Crayons Applique Onesie


My parents recently brought me my sewing machine, which I had been storing at their house and I got right to work making a onesie with a felt applique of a crayon box.  I picked this design because I have a ton of colorful wool blend felt that I have been itching to use.

Here are the pieces I cut for the applique.  I ended up adding a green oval to the crayon box and small navy ovals to the crayons.  If I make this design again I would probably add those small details by hand...I think it would be easier than fussing with the machine.


After cutting the pieces I first sewed the crayon box to the onesie and then I attached the crayons to a scrap piece of fabric so that I could attach them to the onesie as one piece:


Here they are attached:


I then attached the crayons to the crayon box by sewing along the outer rim of the set of crayons and I used a zig zag stitch along the top of the crayons to make them look a little more realistic.

I really like the way it turned out and I might make a long sleeved version for the fall.

Tuesday, August 30, 2011

Rainbow Bath Paint


I bought my son some bathtub crayons recently which I thought would be great...until we started using them.  They stained his hands and last for about three baths before they run out....not to mention they are not cheap considering how long they last.  I came across this idea recently and had to give it a shot.

You will need:
Inexpensive white shaving cream (I don't think shaving gel would work so well)
Food coloring
A palette (I used a cupcake pan, which worked great).

Recipe:
Fill each cupcake mold full of shaving cream and add in about four to six drops of food coloring.  That's it!

The vibrant colors were fun to mix too:


We had a blast playing with it and since shaving cream doesn't sting when it gets in your eyes, it is the perfect toddler bath activity.  It washed easily off our walls and didn't stain any fingers.  Also, isn't shaving cream basically soap?  We did a little body painting too!


Saturday, August 27, 2011

Lemonade During a Hurricane


We have been stuck in the house since the city has pretty much shut down in preparation for Hurricane Irene, so I decided to make some lemonade to brighten our day.  I started making lemonade this summer because I had thought it would be a great thing to do with my three year old son.  As it turns out, it's not such a great pre-schooler activity for two reasons.  First because it takes too much elbow grease for little ones and second because my son can't stop trying to stuff handfuls of sugar into his mouth when I'm not looking.  Even so, we have become pretty addicted to it.  I have also made limeade too, which I may like even more then regular lemonade.  The thing I like best about homemade lemonade is that you can control the tartness and sweetness to make the perfect juice for your taste.  I also love it in our icepop molds.  Here is the recipe I follow, but you will most likely want to tweak it to your own taste.


Ingredients:
3/4 cups of sugar
7 - 8 cups of water
6 - 8 medium lemons (~10 oz of lemon juice)


Directions:
1) Combine 3/4 cups of sugar and one cup of water in a small sauce pan.  Bring to a boil to make a simple sugar and then refrigerate to cool.
2) Squeeze the juice from 6 - 8 medium lemons (you should get about 10 ounces of juice and I like to include some pulp too).
3) Add about three quarters of the lemon juice and three quarters of the simple syrup to your pitcher.  
4) Add 6 cups of water to your juice and sugar mixture.  Add the remaining sugar, lemon juice, and water to taste.
5)  I also love my lemonade with fresh mint.  It adds a very clean taste.  The lemon juice turns the mint leaves browns so I leave them in for about 12 hours and then fish them out with a small strainer.

Enjoy!


Tuesday, August 23, 2011

Embellished Burp Cloths and Coffee for New Parents


I am blessed to have a very creative and talented sister-in-law who is a graphic designer and crafter.  She wrote the post below about a creative birth gift she just sent to some close friends.
________________________________________________________________________

Our longtime friends just welcomed their first baby girl into this world and since we won't be able to visit for a little while, we wanted to send them a care package. I've heard that burp cloths come in very handy with newborns, plus they're an easy gift to make using fabric and pre-fold cloth diapers.

You will need:
-pre-fold cloth diapers (I prefer these: http://www.toysrus.com/product/index.jsp?productId=2459691)
-fabric
-bias tape or ribbon
-sewing machine, iron, scissors or rotary cutter and measuring tape or ruler

I pretty much followed this useful tutorial online:

The only part that I changed was I omitted the decorative ribbon on the edges of the fabric and added bias tape at the top and bottom edges of the burp cloth since I thought they looked unfinished. I bought the widest bias tape I could find, folded it in half and sewed it onto the edges of my burp cloth, after I had sewn on the fabric.

Once they were sewn, ironed and folded, I packaged them up with our favorite Seattle coffee for the sleep-deprived new parents.


Sunday, August 21, 2011

Ice Pops on the Highline

We took a family adventure to The Highline, which is an abandoned elevated train track on the west side of Manhattan which has been converted to a public park.  Most of the train tracks are still intact, but with beautiful vegetation planted everywhere.  Around every turn of the park is another surprise...whether it is beautiful wood lounge chairs sitting on the old train tracks or water features or picturesque areas to view the city.  I got a few minutes to relax while my husband and son enjoyed getting their feet wet.


One fun surprise was a very popular ice pop stand that sold many great flavors of pops.  Here are a few ideas for your next ice pop making effort:


Saturday, August 20, 2011

Super Easy Superhero Mask


I have a whole lot of felt left over from a previous project and I am always looking for ways to use it.  My oldest son is obsessed with superheros (even though he has never actually seen any superhero movies or read any superhero comics) so I decided to make him a super hero mask.  First I cut out a template from paper and held it up to his face and trimmed it to fit his eye position.  Then I cut out the blue background a little bigger than the pattern and the red piece exactly the same size as the pattern.  I hand stitched them together since I didn't have my sewing machine.  Lastly, I added the yellow lightening bolts for a little extra superhero-ness and sewed on a thick elastic strap.

A success!


I pinned my felt pieces together before sewing them so they lined up correctly, but you could also iron on some fusing to stick them together before you sew them.

Here is the template I sketched out:


Now all he needs is a new cape...stay tuned!

Tuesday, August 16, 2011

A Rainbow While I am Under the Weather


My little one came down with a high fever yesterday and then I seemed to have caught it last night (for me it is taking the form of strep throat...bleg) so I am a little behind on my blogging.  While I recover, I thought I'd share a few more photos from our weekend candy excursion.  On our way from candy store #1 to candy store #2 we had the good fortune (not sure if my husband would agree) of passing right by Purl Soho.  If you haven't heard of it, Purl Soho is a gorgeous store that sells yarns and fabric as well as craft supplies.  They have impeccable taste and their store is an explosion of color...any knitters dream!


Purl Soho has a wonderful website and an even better blog call the PurlBee where they have beautiful tutorials like felt citrus coasters.  I hope Purl Bee inspires you!

Saturday, August 13, 2011

Sweet Summer in the City

Sockerbit: 89 Christopher Street, NYC

I recently heard of two candy shops downtown and decided that my family should spend the morning checking them out.  Our first stop was Sockerbit in the West Village (probably my favorite neighborhood in Manhattan).  I learned about this shop from a Martha Stewart Blog Post.  Sockerbit is a candy shop that specializes in Swedish Candy...or in other words, gummy candy.  It is a striking, all white store with rows and rows of colorful candy.


My husband, son and I were in heaven.  Though it was a little tricky keeping my son's little fingers out of the bins.


The candy we purchased was delicious and the people who worked there were very knowledgeable about their selection.  We will definitely be back.

Sockerbit window display

Next we walked about a mile to PapaBubble located at 380 Broome Street in Soho.  PapaBubble is a candy store that makes handmade hard candies and lollipops.  


Their kitchen is right in the shop and you can watch as they layer and role the warm candy into beautiful creations.  When we were there they were making red, white and blue candy that said "Queens" for their borough candy mix.


Here are a few of my favorites.

Nautical candies
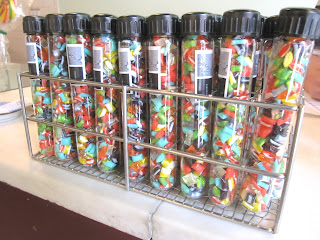
Test tube candies....great gift idea!
Many of their candies are available for mail order on their website, so you don't have to live in NYC (or one of the many European cities where they have their storefronts).  Papa Bubble also makes custom candies.  My understanding is that you have to buy a pretty substantial amount (about 100 small bags is the minimum), but they would certainly make a memorable party favor.


Friday, August 12, 2011

A Yummy Cool Treat and a Great Summer Gift


One of my favorite cool treats is homemade ice pops. They can be made with any fruit juice you have in your fridge (they take about 4-6 hours to freeze completely) or you can get a little fancier (and more sophisticated) with combos like coffee with vanilla ice cream, or mojito flavored pops for the adults. These are also great for that peach or watermelon that is a little mealy or not so sweet. You can just put your fruit into the ice pop mold and then fill it with fruit juice. The juice will increase the sweetness of the fruit and the mealy texture disappears when the fruit is frozen.

Ice pop molds also make a great summer housewarming or birthday gift. They cost about $5-$15 and can be purchased at stores like Bed Bath & Beyond or Williams Sonoma. An added nice touch is to gift them with the pops already made. I recently gave this set as a "Thank You" gift to some friends who were extremely helpful when our second baby was born. These pops were made with homemade lemonade and organic strawberries. I will post the lemonade recipe shortly.


For a more substantial gift, you can also include an ice pop recipe book. Here is one I recently bought for my parents from our favorite bookstore in Vermont, the Northshire Book Store. If you are ever in Manchester, VT you should definitely stop by.


Thursday, August 11, 2011

A Gorgeous Nursery Featuring "Just Bunch" Prints!


The other day I stumbled upon Meagan's lovely blog "Meagan's Musings" where she featured her recently completed nursery, which included these three Just Bunch prints!


I love the elegant simplicity of this nursery and the grey walls make the room sophisticated and feminine.


Soon to come...pics from our nearly completed nursery!

Wednesday, August 10, 2011

Toddler Glam - Rainbow Macaroni Beads


On a recent rainy day my three year old son and I made rainbow macaroni beads. It was fun from start to finish and whenever he sees the beads, he asks if we can play with them. They were very easy to make:


  1. Mix 2 Tbsp. rubbing alcohol and about 6 drops of food coloring (more if you want deeper color) in a Ziploc bag.
  2. Add in 1 cup of uncooked macaroni (I liked the flowers and small 1/4 tubes the best).
  3. Zip the bag closed and then put the bag into a second bag (I found that when we only used one bag there were leaks...double bagging did the trick) and squeeze the macaroni around in the alcohol for about 2 minutes until it’s evenly colored.
  4. Cover a cookie sheet with two layers of paper towels and spread the colored macaroni out to let it dry. It should take about 20-30 minutes to dry.


Don't be discouraged about the color of your beads when you are making them. They look quite muddy and dull until the dry completely.

My son made necklaces for his grandmas:

And I got a little carried away with mine (and actually wore it to work the next day!):


One important trick I found (especially if you are going to do this project with small kids)...feeding the flimsy string through the macaroni can be tricky, so if you dip the first inch or so of the string in glue and allow it to dry before beading, you will have a nice firm tip which is much easier for little ones to work with.


Monday, August 8, 2011

Cherry TOMATO Cobbler! Who would have thought?!


I recently tried this Cherry Tomato Cobbler from my Martha Stewart Living Magazine and LOVED it! It didn't quite take me the full 50 minutes to prepare, as suggested, nor an hour and ten minutes to cook (mine was ready in about 50 minutes). My husband and I loved it and I sent the recipe right on to my family members for them to try. I was raised by my health conscious mom to always reduce the butter in recipes by 25%, but in this case I kept the full stick of butter since I didn't have heavy cream in the house. I used 1% milk instead, which worked very well. It didn't taste dry and had I not baked it myself, I never would have known there was a substitution! Let me know if you give it a try and what you think!


Saturday, August 6, 2011

A Playtime Breakfast and a Yummy Lunch


My son and I had a great time playing with his breakfast play-doh set this morning. I got a little carried away:


But for lunch we had great (and edible) pesto chicken salad sandwiches. I used some left over Costco rotisserie chicken (the best deal in town) which I chopped into cubes and mixed with a little mayo and some pesto which I made and froze last week. I also had some purple basil from our CSA. "CSA" stands for community supported agriculture and essentially you buy a season's worth of veggies from a local farm and each week of the growing season you receive a variety of freshly harvested produce from the farm. It is a great way to buy local, and often organic, while cutting out the middle man. See below for the pesto recipe. All the quantities are pretty flexible and it freezes great so I always make a large amount and then freeze it. We put it on everything(pasta, sandwiches, hamburgers, artichokes, etc).


Pesto Recipe:
1/3 cup of almonds or pine nuts
2 cloves garlic or some equivalent amount of powdered garlic (I just dump some in)
2 1/2 cups of loosely packed basil (this is vague, sorry, but it doesn't matter super much)
1/2 cup olive oil
1/2 cup parmesan

Directions:
1) Separate basil from large stems, figure out how many cups you have and base rest of inredients on how much pesto you have (double batch? Triple?)
2) Grind (blender is fine) nuts and garlic cloves together - if using powdered garlic, add garlic at next step
3) Add basil and olive oil (and garlic powder if appropriate), chop this
4) Add parmesan, mix
5) May or may not want to add a bit of salt later, to taste


Tuesday, August 2, 2011

Blogging take two...and a new direction for Just Bunch

I had sort of a false start with my initial effort at blogging, but after seeing the lovely blog that my sister has been working on, I have decided to give it another go. Check it out here. When I first started my Etsy shop a few years ago, I was making personalized name paintings, but I have since made a switch to children's prints for nurseries and bedrooms. Here are a few examples: